Wednesday, 1 April 2020

Implementing Swagger In Web API and enabling CORS

Create the Web API project
Once the controller had been created, now it's time to add Swagger into our project, for that we need to add a NuGet Package – Swashbuckle.

Implementing Swagger In Web API
 
Once you have installed Swashbuckle to your project you can find a SwaggerConfig file in App_Start.

Implementing Swagger In Web API
 
By default Swagger does not show XML Comments, there is an option to display them with Swagger UI, but for that, we need to make sure, when the project is built all the XML comments get saved into the XML file. For that, first, go to project properties. In the Build Section check > XML documentation file, you will then get a path. Mine is bin\DemoWebAPIWithSwagger.XML
 
Save it with Ctrl + S,
 
Now, go to SwaggerConfig file shown above, here search for c.IncludeXmlComments(GetXmlCommentsPath()) and uncomment it. Now
you can generate the method using intellisense or you can write a method on the end of the config file.
  1. private static string GetXmlCommentsPath()  
  2. {  
  3.    return System.AppDomain.CurrentDomain.BaseDirectory + @"\bin\DemoWebAPIWithSwagger.XML";  
  4. }   
NoteChange the type of method to string.

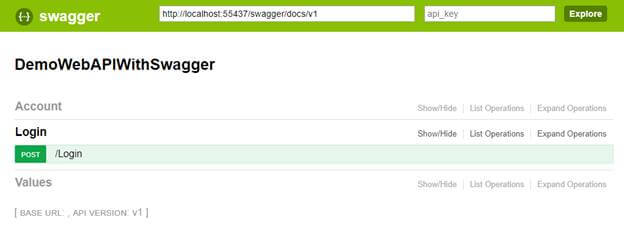
We are all done now... Let’s run our project. AFter page opens Add /Swagger in url = > http://localhost:5543/swagger
Now you will get a page like this
ou can find our Swagger UI Here,

Implementing Swagger In Web API

ASP.Net Web API 2 CORS Support:

Enabling Cross Origin Resource Sharing in ASP.Net Web API 2 is simple, once it is enabled any client sending AJAX requests from webpage (on a different domain) to our API will be accepted.
By default CORS assembly doesn’t exist within ASP.NET Web API 2 assemblies so we need install it from NuGet, so open your NuGet package console, and type the following  Install-Package Microsoft.AspNet.WebApi.Cors -Version 5.0.0 once the package is installed open “WebApiConfig” class and add the following line of code inside the register method config.EnableCors(); by doing this we didn’t enable CORS yet, there are different levels to enable CORS on ASP.Net Web API, levels are:

1. On controller level

You can now add attribute named EnableCors on the entire controller so by default every action on this controller will support CORS as well, to do this open file “CoursesController” and add the highlighted line of code below:
The EnableCors attribute accept 3 parameters, in the first one you can specify the origin of the domain where requests coming from, so if you want to allow only domain www.example.com to send requests for your API; then you specify this explicitly in this parameter, most of the cases you need to allow * which means all requests are accepted from any origin. In the second parameter you can specify if you need a certain header to be included in each request, so you can force consumers to send this header along with each request, in our case we will use * as well. The third parameter is used to specify which HTTP verbs this controller accepts, you can put * as well, but in our case we want to allow only GET and POST verbs to be called from requests coming from different origin.
In case you want to exclude a certain action in the controller from CORS support you can add the attribute DisableCors to this action, let we assume we want to disable CORS support on method GetCourse so the code to disable CORS support on this action will be as the below:

2. On action level

Enabling CORS on certain actions is fairly simple, all you want to do is adding the attribute EnableCors on this action, as well EnableCors accepts the same 3 parameters we discussed earlier. Enabling it on action level will be as the below code:

 3. On the entire API

In some situations where you have many controllers and you want to allow CORS on your entire API, it is not convenient to visit each controller and add EanbleCors attribute to it, in this situation we can allow it on the entire API inside the Register method in Class WebApiConfig, so open your WebApiConfig class and add the code below:
By adding this we enabled CORS support for every controller we have in our API, still you can disable CORS support on selected actions by adding DisableCors attribute on action level.

Sunday, 29 March 2020

Const, ReadOnly and Static ReadOnly in C#

These are very common keywords and are quite confusing. So today we will discuss these keywords and try to understand them.
  1. Const


    Const is nothing but "constant", a variable of which the value is constant but at compile time. And it's mandatory to assign a value to it. By default a const is static and we cannot change the value of a const variable throughout the entire program.

    Csharp-Const-ReadOnly-and-StaticReadOnly1.jpg

    Here I have created a class named Variables and defined all three variables, so first let's play with const.

    Csharp-Const-ReadOnly-and-StaticReadOnly2.jpg

    Here I tried to de-initialize the const variable, it gaves me an error like "A const field requires a value to be provided". Ok now I initialize a value for this variable and try to change it further in the class.

    Csharp-Const-ReadOnly-and-StaticReadOnly3.jpg

    Here I have created a static constructor, default constructor, parameterized constructor and a Simple Method. I tried to change the value of the const variable everywhere but once I assign the value, I am unable to change it again since when I do it gives me a compile time error as you can see in the snapshot above.

    Now let's on to the readonly keyword.
  2. Readonly


    Readonly is the keyword whose value we can change during runtime or we can assign it at run time but only through the non-static constructor. Not even a method. Let's see:

    Csharp-Const-ReadOnly-and-StaticReadOnly4.jpg

    Here first I try to initialize the value in the static constructor. It gives me an error. Which you can see above. Now I try to change the value in a method, see what happened,
    Csharp-Const-ReadOnly-and-StaticReadOnly5.jpg

    Here, it is also giving an error that you can only assign a value either through a variable or a constructor. Now try to change the value in the default constructor.

    Csharp-Const-ReadOnly-and-StaticReadOnly6.jpg

    Now in the snapshot above you can see it's built successfully without an error, warning or messages. Let's check if there is a runtime error. OK.

    Csharp-Const-ReadOnly-and-StaticReadOnly7.jpg

    Now here we can see that there is not a runtime error and the value was assigned successfully to the Readonly variable. Now one gotcha is, now that you have assigned the value, can you change this value again ??? Let's try to change the value again.

    Csharp-Const-ReadOnly-and-StaticReadOnly8.jpg

    Here I created a parameterized constructor and created a new object, and passing a value as "Hello Frend'z" and as I built it, it gave me the result "Build Succeeded". Now let's move ahead and check for a runtime error:

    Csharp-Const-ReadOnly-and-StaticReadOnly9.jpg

    See guys. There is no runtime error !! And the value can be changed again and again through a constructor.

    Now move ahead to Static Readonly variables.
  3. Static ReadOnly


    A Static Readonly type variable's value can be assigned at runtime or assigned at compile time and changed at runtime. But this variable's value can only be changed in the static constructor. And cannot be changed further. It can change only once at runtime. Let's understand it practically.

    Csharp-Const-ReadOnly-and-StaticReadOnly10.jpg

    Now in the preceding you can see that I used two variables, one is not assigned and another is assigned, and the static constructor. Now in the static constructor you can see that the unassigned variable is being assigned and the assigned value is being changed. And there is no compile time error. Further I try to again change this variable's value. See what happened:

    Csharp-Const-ReadOnly-and-StaticReadOnly11.jpg

    As you can see in the above, I created Default, Parameterized Constructor and Method and tried to change the value again here. But I am getting a compile time error for all.

Baisic Useful Git Commands

  Pushing a fresh repository Create a fresh repository(Any cloud repository). Open terminal (for mac ) and command (windows) and type the be...