Wednesday, 15 April 2020

How to convert an Object {} to an Array [] of key-value pairs in JavaScript/typescript?

The task is to convert an Object {} to an Array [] of key-value pairs using JavaScript.
Introduction: Objects, in JavaScript, is it’s most important data-type and forms the building blocks for modern JavaScript. These objects are quite different from JavaScript’s primitive data-types(Number, String, Boolean, null, undefined and symbol). Objects are more complex and each object may contain any combination of these primitive data-types as well as reference data-types, while the array is a single variable that is used to store different elements. It is often used when we want to store list of elements and access them by a single variable.
We can convert an Object {} to an Array [] of key-value pairs using methods discussed below:
Method 1: In this method, we will use Object.keys() and map() to achieve this.
Approach: By using Object.keys(), we are extracting keys from the Object then this key passed to map() function which maps the key and corresponding value as an array, as described in the below example.
Syntax:
  • Object.keys(obj)
    Parameter:
    obj: It is the object whose enumerable properties are to be returned.
  • map(function callback(currentValue[, index[, array]]){
        // Return element for new_array
    }
    Parameter:
    callback: Function that produces an element of the new Array
  • <script> 
        // An Object
        var obj = { "1": 5, "2": 7, "3": 0, "4": 0, "5": 0 };
          
        // Using Object.keys() and map() function
        // to convert convert an Object {} to an 
        // Array [] of key-value pairs
      
        var result = Object.keys(obj).map(function (key) {
              
            // Using Number() to convert key to number type
            // Using obj[key] to retrieve key value
            return [Number(key), obj[key]];
        });
          
        // Printing values
        for(var i = 0; i < result.length; i++) {
            for(var z = 0; z < result[i].length; z++) {
                document.write(result[i][z] + " ");
            }
            document.write("</br>");
        }
      
    </script> 
  • Output:
    1 5
    2 7
    3 0
    4 0
    5 0
    Method 2: In this method, we will use Object.entries() to achieve this.
    Approach: We will use Object.entries() which is available in JavaScript. Object.entries() method is used to return an array consisting of enumerable property [key, value] pairs of the object which are passed as the parameter. The ordering of the properties is the same as that given by looping over the property values of the object manually.
    Syntax:
    Object.entries(obj)
    Parameter:
    obj: It is the object whose enumerable own property [key, value] pairs are to be returned.
    Example:
  • <script> 
        // An Object
        var obj = { "1": 500, "2": 15, "5": 4, "4": 480, "10": 87 };
          
        // Using Object.entries() function
        // to convert convert an Object {} to an 
        // Array [] of key-value pairs
        var result = Object.entries(obj);
          
        // Printing values
        for(var i = 0; i < result.length; i++) {
            for(var z = 0; z < result[i].length; z++) {
                document.write(result[i][z] + " ");
            }
            document.write("</br>");
        }
      
    </script>       
  • Output:
    1 500
    2 15
    4 480
    5 4
    10 87

Wednesday, 8 April 2020

Use ngfor,ngif together on same element in angular


In Angular, we cannot use two structural directives on the same element.
i.e., we cannot place *ngFor,*ngIf together on same element.
<div *ngIf="shouldShow" *ngFor="let order of orders">
  <li></li>
</div>
The above code returns following error.
Can’t have multiple template bindings on one element. Use only one attribute prefixed with *

Table of Contents

Reasons Why we cannot use two structural directives on same element.

  1. Structural directives like ngfor can do complex things with the host element and its childrens.
  2. When two directives placed on same element we cannot decide which one takes precedence i.e., which should execute first *ngIf or *ngFor?
  3. What if *ngFor executes before *ngIf, which is supposed to display or hide the elements.
There is no easy solution for this. The only way is to prohibiting use of multiple structural directives on same element.

Use ngFor and ngIf on same element

It’s very common scenario where we want to repeat a block of HTML using ngFor only when a particular condition is true. i.e., if ngIf is true.
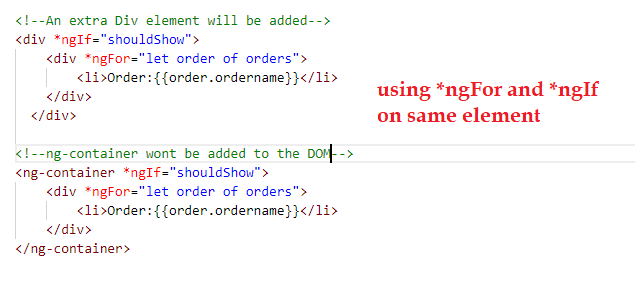
So in this case to use *ngIf and *ngFor on same element, place the *ngIf on a parent element that wraps the *ngFor element.
<div *ngIf="shouldShow">
  <div *ngFor="let order of orders">
      <li></li>
  </div>
</div>
In the above code we are telling angular that execute *ngIf first, If the condition is true then repeat the HTML using *ngFor.
But we are adding one extra div element which will be added to the DOM if ngIf is true. To avoid this we can use ng-container element.
ngIf ngFor same element

ngIf ngFor same element

Use ngFor and ngIf together using ng-container

ng-container is a logical grouping element that will not be added to the DOM. that means no styles or layout applied to it.
We will refactor the above code using ng-container as shown below.
<ng-container *ngIf="shouldShow">
  <div *ngFor="let order of orders">
      <li></li>
  </div>
</ng-container>
If you see the below picture there is no element is added to the DOM.
ngif ngFor same element with ng-container

Bind Select element to object in Angular with examples


To bind select element to object in angular use [ngValue] property.
We will go through an example to understand it further. we will create a component called BindSelectToObjectComponent in our angular project.
@Component({
   selector: 'app-bindselecttoobject',
   templateUrl: './bindselecttoobject.component.html',
   styleUrls: ['./bindselecttoobject.component.scss'],
})
export class BindSelectToObjectComponent{
  
  languageObjects : language[];
  selectedObject : language;

  constructor() { 
    this.languageObjects = [
      {id: 1, name: "Angular"},
      {id: 2, name: "Typescript"},
      {id: 3, name: "Javascript"},
      {id: 4, name: "Java"},
      {id: 5, name: "DotNet"}
    ]
  }
}

interface language{
   id:number;
   name:string;
}
I created an interface object called language which has id and name properties.
In component ts file added a variable selectedObject which of object language and will bind it to select element using [ngModel].
And another variable languageObjects which contains list of objects which is used to display select options using [ngValue].
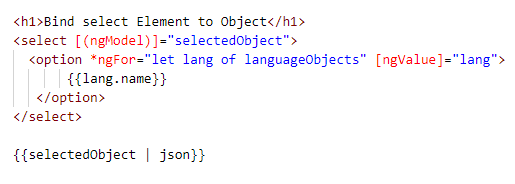
<h1>Bind select Element to Object</h1>
<select [(ngModel)]="selectedObject">
  <option *ngFor="let lang of languageObjects" [ngValue]="lang">
       {{lang.name}}
   </option>
</select>

{{selectedObject | json}}

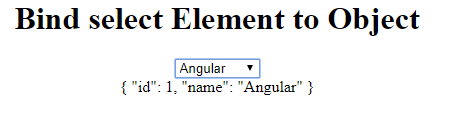
Now the selectedObject contains language object itself.
And we can display it using json pipe as shown below.

bind select element to object


Angular+ Hello World Example with basics and fundamental

I will explain how to create an Angular 7 app with a simple “Hello World” example. This hello world example work in Angular 4,Angular 5,Angular 6,Angular7.
Let us start with Angular Hello World example to know the basics of Angular 7.
Before reading further, please go through my previous tutorial on how to setup local development environment for Angular.
We will use Angular CLI as mentioned in the above tutorial to create our Angular application.
Here are the steps to create first hello world application in Angular 7

Table of Contents


Creating First Angular 7 Hello World Example

We create a project called Hello World in Angular 7.
I recommend you to create a folder in your local disk so that all Angular examples are one place.(For instance create a folder named AngularExamples).
Open command prompt navigate to created folder; use the ng new command (Angular CLI) to create a new Angular project from scratch.
ng new hello-world-angular
It will take some time to create new project.
If you are using latest version of Angular CLI by default it uses Angular 7 (i.e., latest angular version). And there is no much difference between Angular 2 or Angular 4 or other versions it’s just an update. Please go through the following article to know more about this versioning of Angular.
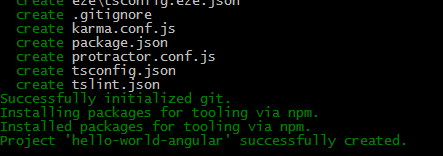
After successful completion, you should see following message.

hello-world-angular-created

hello-world-angular-created


Project “hello-world-angular” successfully created.
Now navigate to the created ‘hello-world-angular’ directory.
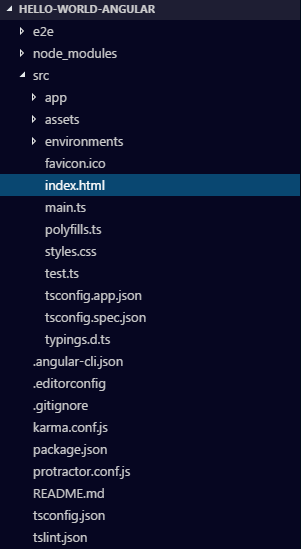
Use your favourite editor (my choice would be visual studio code) open the created folder. The directory structure will be something like below.

Angular Directory structure

Angular Directory structure


This structure may vary depending upon the version of Angular CLI version (this article uses latest version of Angular CLI so it would be Angular 4).
Navigate to D:\AngularExamples\hello-world-angular\src\index.html file.
<!doctype html>
<head>
<meta charset="utf-8">
<title>HelloWorldAngular</title>
<base href="/">
<meta name="viewport" content="width=device-width, initial-scale=1">
<link rel="icon" type="image/x-icon" href="favicon.ico">
</head>
<body>
<app-root>Loading...</app-root>
</body>
</html>
You can see <app-root> tag this where our application will be rendered.
In Angular 2 (or Angular) world, we can create our own HTML tags & give them custom functionality, we will call them “Components”.
App-root is component auto generated by Angular CLI.
Now in command prompt type
ng serve
Then browse http://localhost:4200 it will show App Works as shown below.

Angular CLI Sample Example

Angular CLI Sample Example


Creating a Component in Angular 7

We will create a component using Angular CLI command.
ng generate component hello-world
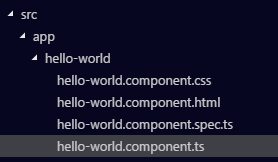
It will create four files as shown below
  • src/app/hello-world/hello-world.component.css
  • src/app/hello-world/hello-world.component.html
  • src/app/hello-world/hello-world.component.spec.ts
  • src/app/hello-world/hello-world.component.ts.

Angular Hello World Component

Angular Hello World Component


Open “hello-world.component.ts” file in editor.
import { Component, OnInit } from '@angular/core';

@Component({
selector: 'app-hello-world',
templateUrl: './hello-world.component.html',
styleUrls: ['./hello-world.component.css']
})

export class HelloWorldComponent implements OnInit {

constructor() { }

ngOnInit() {
}

}
This is a simple component written typescript.
If you know java or C# it is easy to understand but do not worry, we will understand each line one by one.
Here we are declaring a class named “HelloWorldComponent” which is a component.

Importing Dependencies in Component in Angular 7

First line tells the compiler that import “Component” and “OnInit” objects from @angular/core (node module installed when we created project via Angular CLI).

Component Decorators in Angular 7

After importing Component object, we have to tell the compiler that this class is a Component.
In Angular 7 (or Angular) we will use Decorators in typescript to do this. So Decorators are nothing but metadata added to our code.
For example in \hello-world-angular\src\app\app-module.ts file, Decorator tells that it is a class named “AppModule” which is a Module (NgModule).
@Component({
});
@Component({
selector: 'app-hello-world',
templateUrl: './hello-world.component.html',
styleUrls: ['./hello-world.component.css']
})
Component Contains Three important declaration

Selector in Angular 7 component

Selector property indicates the tag name we are going to use in DOM.
<app-hello-world></app-hello-world >
(While creating component we gave name as “hello-world” Angular CLI added app as prefix).

TemplateUrl in Angular 7 Component

<app-hello-world> tag uses hello-world.component.html file as html template. So whenever we use <app-hello-world></app-hello-world> it will display the contents of file HTML located in
\hello-world-angular\src\app\hello-world\hello-world.component.html
Instead of giving templateUrl we can use inline html also. As shown below
@Component({

selector: 'app-hello-world',
template:` <p>
hello-world works!
</p>`,
styleUrls: ['./hello-world.component.css']

})
For small html contents, we can use inline html template. HTML in between backticks(`….`).
It is better to use separate template because most of the code editors do not support syntax highlighting in inline HTML strings.

styleUrls in Angular 7 Component

This property tells the compiler that use the styles located in hello-world.component.css for this component.
These are the main properties in Components in Angular 7 (or Angular)
Now open \hello-world-angular\src\app\app.component.html file and add the created component as shown below.
<h1>
  {{title}}
  <app-hello-world></app-hello-world>
</h1>
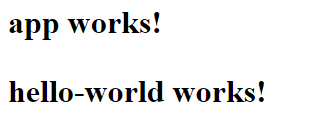
Now refresh the browser

Hello world angular example

Hello world angular example


Adding Data to the Component in Angular 7

We have rendered static template, now we will add some data to the component.
Open “hello-world.component.ts” file in editor.
And add the name property as shown below.
name:string;
We are declaring a property or variable named “name” which is a string type. This is similar to declaration of variables in object-oriented languages. If we assign any type other than string the compiler will throw error.
import { Component, OnInit } from '@angular/core';

@Component({
selector: 'app-hello-world',
templateUrl: './hello-world.component.html',
styleUrls: ['./hello-world.component.css']
})

export class HelloWorldComponent implements OnInit {

name:string;

constructor() {

this.name="AngularJs Wiki"

}

ngOnInit() {
}

}
In constructor we will assign name variable. Constructor will be called whenever we create a new instance of a class. Similar to C# or Java language.

Rendering Angular 7 template

Now we have to use the declared variable in our template file i.e., HTML file. We have to use two curley brackets to display the value of variable {{ }}. We will call them template tags.
To use the name variable open the template file hello-world.component.html
<p>

hello-world works!
{{name}}

</p>
As the template bind to component(hello-world component) whenever compiler encounters flower brackets(i.e., template tags) it will replace the text with bounded property (i.e., name) value i.e., ”Angular Js Wiki”.
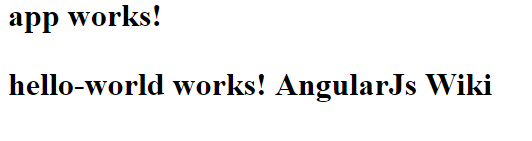
Now refresh the browser

hello world angular example with data


Baisic Useful Git Commands

  Pushing a fresh repository Create a fresh repository(Any cloud repository). Open terminal (for mac ) and command (windows) and type the be...